

Microsoft Office 365 is one of the top-serving cloud platforms and is used by many organizations across the globe. Oftentimes, companies have to make decisions in order to merge with another company or acquire one. In such cases, you have to move domain from one Office 365 tenant to another.
In fact, many users are searching for solutions to transfer their domain between tenants. Let’s have a look at one user query.
“Hello, I am the system administrator of our organization. Lately, I’m facing difficulty managing the domains after the successful merger. And, I have been looking for solutions to keep the domains in one and migration is the solution. So, I would really appreciate it if anyone could suggest a reliable method to perform the migration. Thanks in advance.”
If you too have a similar query then let me break the truth to you that Office 365 migration is quite a tedious task to complete. And, you can’t just ignore expanding your business because of the tiresome process.
Besides, there is always a way out of such types of challenges. So, relax and keep on reading the blog till the end to find out an exceptional solution for moving the domain between Office 365 tenants.
But, first, let’s discuss the below question to get a basic idea of the migration process to transfer domain between Office 365 tenants.
What Do You Need to Do For Executing a Successful Migration?
Before you begin the actual process, it’s always better to follow the below structure for flawless execution.
- Planning
- Selecting the Right Tool
- Perform post-migration routine
So, the first step is to outline the strategy and lay down the foundation stone. Since Office 365 migration differs from organization to organization, you need to plan according to your business need.
With proper planning, you can mitigate various road bumps that you may encounter during the process or at least can be prepared to face those challenges. Hence, research and do the pre-planning, infrastructure planning, etc.
Next comes the most important part of a migration process, i.e. choosing the right method. To be honest, it’s not that difficult. Just consider the experts’ opinion and opt for reliable software like Migrator Wizard Office 365 Migration Tool to transfer domain between Office 365 tenants.
Now, If you are thinking about why to consider the tool? Then, refer to the next section.
Last but not least, after successfully completing the process, ensuring whether all the users are being assigned with the Office 365 licenses or not is equally important. Cause, the entire effort in moving domains between Office 365 tenants could go in vain if the accounts get deactivated because of not assigning the user licenses.
So, consider all the three points precisely to experience the bests of Office 365 migration.
Nonetheless, let’s discuss how the expert-recommended tool can become a helping hand for you to move all your essential files and mailboxes to the new tenant.
Know How Can The Tool Provides Extra Benefit When You Move Domain From One Office 365 Tenant to Another
First of all, the scope of migration is not just limited to migrating emails. Using the tool, you can also transfer your contacts, calendars, tasks, etc, and that to be without any data loss.
The reliable software makes the entire migration process easier and lets even a non-technical user use it efficiently.
Sometimes, organizations want to move multiple users in a single go. And, this utility makes it possible and allows to move domain from Office 365 tenant to another in bulk.
In addition to that after migration, it maintains the folder structure(as in the source) at the destination.
If by any chance some items are left out in the initial run and couldn’t make it to the target tenant. Then, there is an option called ‘Re-run migration’, you can use this to retry failed items, move newly arrived emails, or simply re-run the entire process.
Another added benefit is that you can set the set priority for accounts that you want to move first.
And many more…
Let’s Understand the Working Procedure of The Software to Transfer Domain Between Office 365 Tenants
Office 365 data migration is a complex task, to begin with. Since there is no appropriate manual method to carry out the process, follow the automated steps for smoothly moving your domain data between tenants.
Step-1: Install the Office 365 migrator from the link given and run it on your system.
Step-2: After that, move to the ‘Setup’ section. Configure the source and destination as Office 365 to move the domain from one Office 365 tenant to another
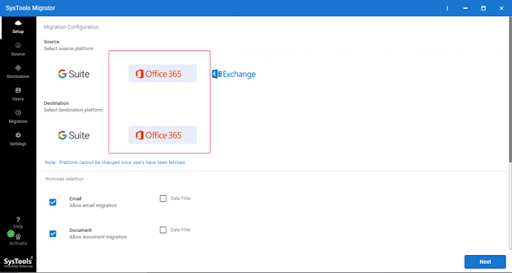
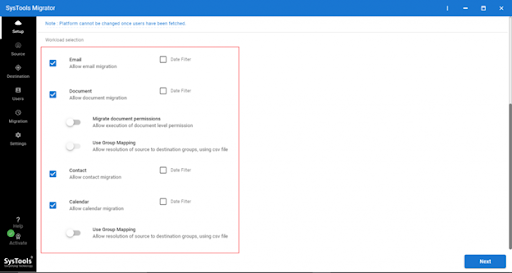
Step-3: Then, scroll down until you see the workload section. There, tick the checkboxes against email as well as contacts, calendars, and documents. After that, hit the ‘Next’ button to move domain from one Office 365 tenant to another.
Further, there is a feature to move selected emails for the desired time duration. Just click on the ‘date filter’ and select the date range.
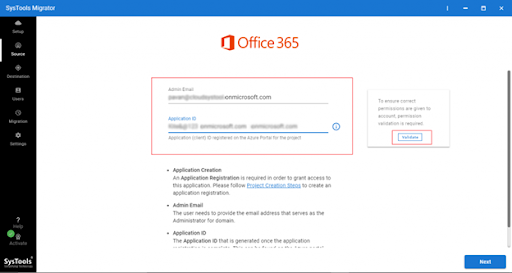
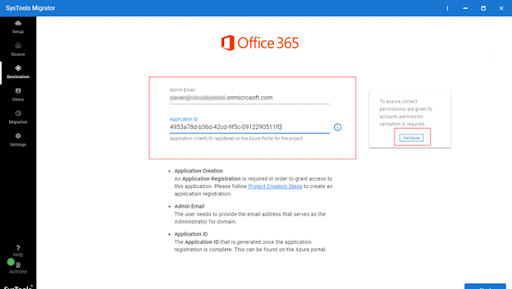
Step-4: Next, move to the Source section. Provide correct Source Office 365 admin ID and application ID. Then, click on the ‘Validate’ button for verifying the source permissions.
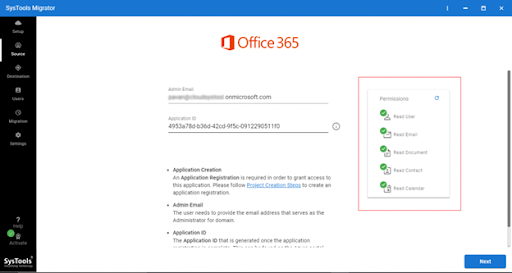
Step-5: After that, you will observe that the desired permission turns green. It indicates that you can move your Office 365 data from one tenant to another.
Then, press the ‘Next’ button to move domain from one Office 365 tenant to another.
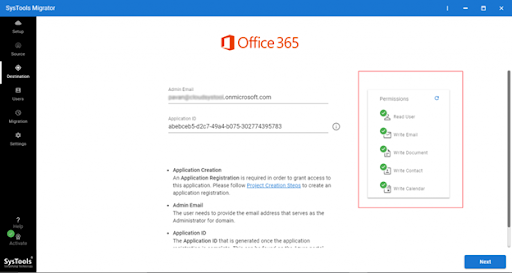
Step-6: Next, go to the destination section. Provide accurate Destination Office 365 admin ID and Application ID. Then, click on the ‘Validate’ button for verifying the destination permission.
Step-7: On the same screen, you will see all required permissions for the destination turn green as shown below.
Press the Next button to move domain from one Office 365 tenant to another.
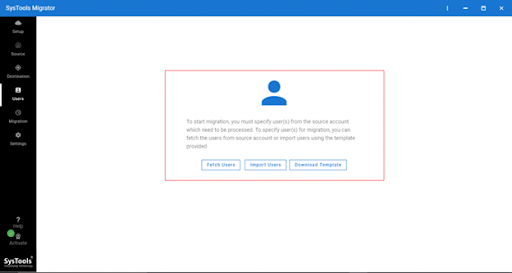
Step-8: Now, you need to map the source and destination users. To do so, first, specify the source users. And, you can easily perform that by choosing any one of the three options:
- ‘Fetch Users’ to fetch all the users from the source domain. However, for destination addresses, you have to enter them manually.
- ‘Import Users’ to import users through CSV
- ‘Download Template’ to get a sample CSV file. In this case, you can add source and destination users to the sheet.
Step-9: After specifying the users, both the source and destination users will appear on your screen like this.
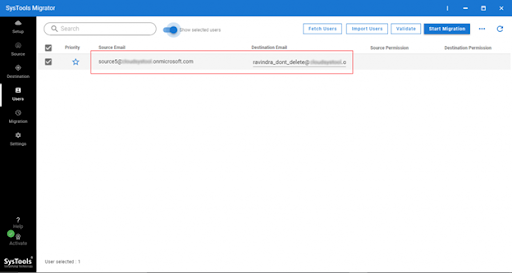
Step-10: Then, you need to again verify all the required source and destination permissions to transfer domain between Office 365 tenants. Click on the ‘validate’ button to perform the same.
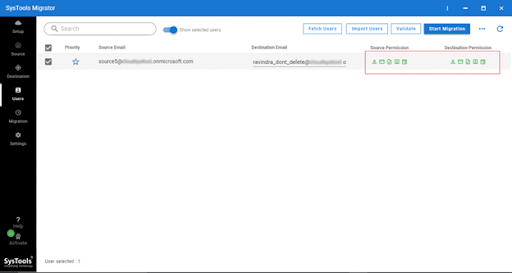
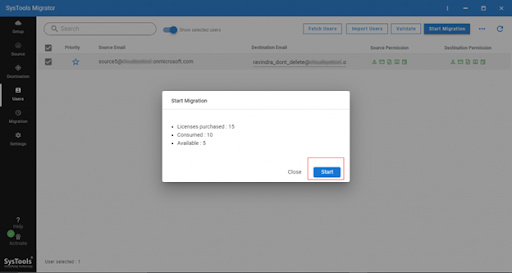
Step-11: After validating and confirming the permission to turn green, you can click on the ‘Start Migration’ button to move the domain from one Office 365 tenant to another.
Final Analysis
Office 365 for organizations is the ultimate cloud platform for business operations. But, let’s face the truth, when it comes to move domain from one Office 365 tenant to another, it is quite a complex task. And, it seems like it’s not impossible to accomplish. However, it can become easier if you have planned it properly, and have the right tool to perform the migration.
So, here we’ve discussed the best method and the complete process in detail for your reference. So that you can carry out a remarkable data migration between Office 365 tenants.
Also, read the latest technology and health blogs by clicking on the given link.


